window Vista以上才支持。
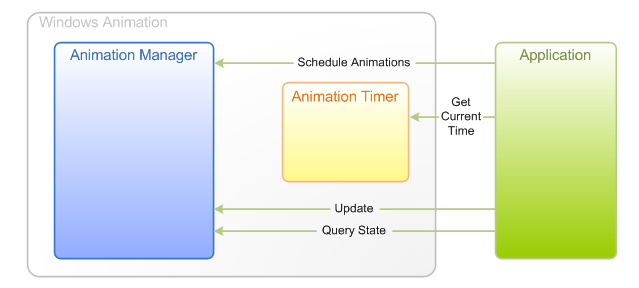
overview 就一张图,直观明了:
各种各样的动画效果 叫做
Storyboard
最简单的是下载一个demo,自己build 一下,如果你下载的是:
然后在 VS2008 里设置好 SDK v71 的include 和 lib 路径,直接build 就可以了。
设置图如下:
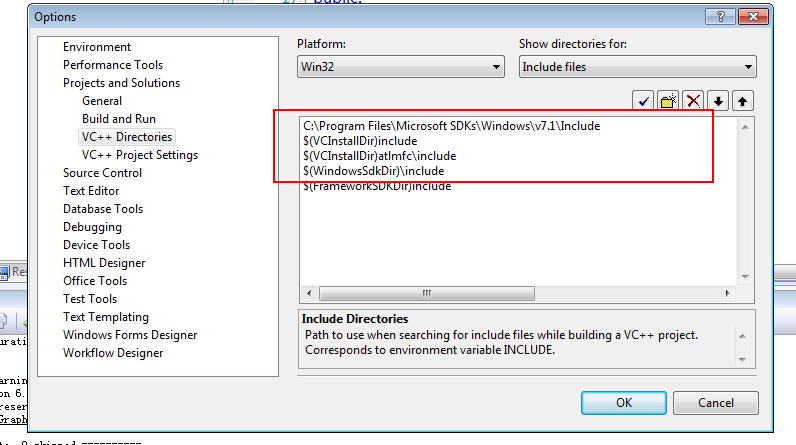
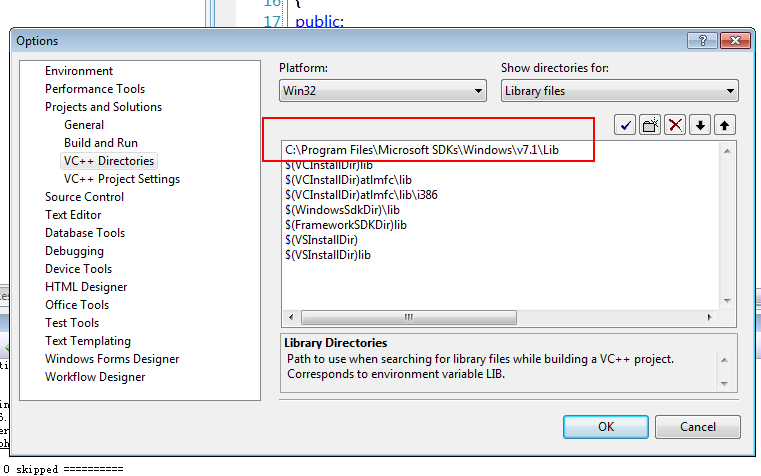
把SDK 的路径都放在第一条哦,不然会 link 不过的。
整个 UI Animation 都是基于 com 架构的,这个也是 windows store app的 基础。
如下的 main function,应该是不离其宗的。
int APIENTRY WinMain(
    HINSTANCE hInstance,
    HINSTANCE hPrevInstance,
    LPSTR lpCmdLine,
    int nCmdShow
    )
{
    HRESULT hr = CoInitialize(NULL);
    if (SUCCEEDED(hr))
    {
        {
            CMainWindow mainWindow;
            hr = mainWindow.Initialize(hInstance);
            if (SUCCEEDED(hr))
            {
                MSG msg;
                while (GetMessage(&msg, NULL, 0, 0) > 0)
                {
                    TranslateMessage(&msg);
                    DispatchMessage(&msg);
                }
            }
        }
        CoUninitialize();
    }
 return 0;
}
在来看 MainWindow.h的一些成员:
// D2D components
    ID2D1Factory *m_pD2DFactory;
    ID2D1HwndRenderTarget *m_pRenderTarget;
    ID2D1SolidColorBrush *m_pBackgroundBrush;
    // Animation components
    IUIAnimationManager *m_pAnimationManager;
    IUIAnimationTimer *m_pAnimationTimer;
    IUIAnimationTransitionLibrary *m_pTransitionLibrary;
    // Animated Variables
    IUIAnimationVariable *m_pAnimationVariableRed;
    IUIAnimationVariable *m_pAnimationVariableGreen;
    IUIAnimationVariable *m_pAnimationVariableBlue;
应该不需要这么多的解释。这个demo用的是 D2D的render,因为 Animation Mgr 不做Render的工作,你可以使用GDI+,等其他graphics 来做render。
一起窗口尤其作动画都离不开paint,让我们来分析一下paint,就是画个背景色,很简单。直接看code 吧。
关键是 IUIAnimationStoryboard 这个接口,它是管理一组transitions,并且是同步的。英文原文如下:
Defines a storyboard, which contains a group of transitions that are synchronized relative to one another.
原始的效果是 左键点击一下 就 换个颜色,换的过程是有 transition的,就是:
CreateAccelerateDecelerateTransition
这个接口是 属于
IUIAnimationTransitionLibrary
那我们可以尝试去改一下
看一下 这个:
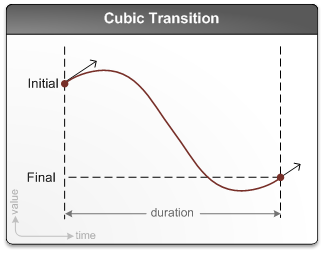
HRESULT CreateCubicTransition(
  [
in
]   UI_ANIMATION_SECONDS duration,
  [
in
]   DOUBLE finalValue,
  [
in
]   DOUBLE finalVelocity,
  [out]  IUIAnimationTransition **transition
);
第一个参数 就 间隔时间, 第二个是最后的值,第三个是速度,就是值按照 cubic 插值,以第三个参数为速度变化到 第二个值 在 duration的时间内。
看图片就明白了:
改后的code 如下:
HRESULT CMainWindow::ChangeColorByCubic(
DOUBLE red,
DOUBLE green,
DOUBLE blue
)
{
const UI_ANIMATION_SECONDS DURATION = 0.5;
const DOUBLE ACCELERATION_RATIO = 0.5;
const DOUBLE DECELERATION_RATIO = 0.5;
// Create a storyboard
IUIAnimationStoryboard *pStoryboard = NULL;
HRESULT hr = m_pAnimationManager->CreateStoryboard(
&pStoryboard
);
if (SUCCEEDED(hr))
{
// Create transitions for the RGB animation variables
IUIAnimationTransition *pTransitionRed;
hr = m_pTransitionLibrary->CreateCubicTransition(
DURATION,
red,
ACCELERATION_RATIO,
&pTransitionRed
);
if (SUCCEEDED(hr))
{
IUIAnimationTransition *pTransitionGreen;
hr = m_pTransitionLibrary->CreateCubicTransition(
DURATION,
green,
ACCELERATION_RATIO,
&pTransitionGreen
);
if (SUCCEEDED(hr))
{
IUIAnimationTransition *pTransitionBlue;
hr = m_pTransitionLibrary->CreateCubicTransition(
DURATION,
blue,
ACCELERATION_RATIO,
&pTransitionBlue
);
if (SUCCEEDED(hr))
{
// Add transitions to the storyboard
hr = pStoryboard->AddTransition(
m_pAnimationVariableRed,
pTransitionRed
);
if (SUCCEEDED(hr))
{
hr = pStoryboard->AddTransition(
m_pAnimationVariableGreen,
pTransitionGreen
);
if (SUCCEEDED(hr))
{
hr = pStoryboard->AddTransition(
m_pAnimationVariableBlue,
pTransitionBlue
);
if (SUCCEEDED(hr))
{
// Get the current time and schedule the storyboard for play
UI_ANIMATION_SECONDS secondsNow;
hr = m_pAnimationTimer->GetTime(
&secondsNow
);
if (SUCCEEDED(hr))
{
hr = pStoryboard->Schedule(
secondsNow
);
}
}
}
}
pTransitionBlue->Release();
}
pTransitionGreen->Release();
}
pTransitionRed->Release();
}
pStoryboard->Release();
}
return hr;
}
然后在 ChangeColor 的function 里直接 调用这个新的function:ChangeColorByCubic,达到 “新旧分离”的目标。
把改变放到一个地方,这样不需要在 调用ChangeColor 的地方都去改。利于代码的维护。
HRESULT CMainWindow::ChangeColor(
DOUBLE red,
DOUBLE green,
DOUBLE blue
)
{
return ChangeColorByCubic(red,green,blue);
然后 build 一下,出来的效果和原先的还是能看出很多区别的。
上面的只是在一个duiration的时间内对RGB 值的更改,其实就是动画的过程中对它们的更改。
我们来看下基本流程的code:
HRESULT CMainWindow::InitializeAnimation()
{
    // Create Animation Manager
    HRESULT hr = CoCreateInstance(
        CLSID_UIAnimationManager,
        NULL,
        CLSCTX_INPROC_SERVER,
        IID_PPV_ARGS(&m_pAnimationManager)
        );
    if (SUCCEEDED(hr))
    {
        // Create Animation Timer
        hr = CoCreateInstance(
            CLSID_UIAnimationTimer,
            NULL,
            CLSCTX_INPROC_SERVER,
            IID_PPV_ARGS(&m_pAnimationTimer)
            );
        if (SUCCEEDED(hr))
        {
            // Create Animation Transition Library
            hr = CoCreateInstance(
                CLSID_UIAnimationTransitionLibrary,
                NULL,
                CLSCTX_INPROC_SERVER,
                IID_PPV_ARGS(&m_pTransitionLibrary)
                );
            if (SUCCEEDED(hr))
            {
                // Create and set the ManagerEventHandler to start updating when animations are scheduled
                IUIAnimationManagerEventHandler *pManagerEventHandler;
                hr = CManagerEventHandler::CreateInstance(
                    this,
                    &pManagerEventHandler
                    );
                if (SUCCEEDED(hr))
                {
                    hr = m_pAnimationManager->SetManagerEventHandler(
                        pManagerEventHandler
                        );
                    pManagerEventHandler->Release();
                }
            }
        }
    }

    return hr;
}
上面的code 先创建 CLSID_UIAnimationManager 的 IUIAnimationManager 接口
然后创建一个 timer IUIAnimationTimer
再次 创建一个 IUIAnimationTransitionLibrary
windows 通常需要一个窗口来接收message,如下:
class CManagerEventHandler :
public CUIAnimationManagerEventHandlerBase<CManagerEventHandler>
这个东西,就是类似 callback,状态变化的时候告诉你,让你可以做些 业务logic的处理。
这个 callback 需要设置给 animation manager。
接着,需要几个 变量,MSFT 把很多东西都给你做了。
CreateAnimationVariable
设置它们的阈值。
接着我们再看一下绘制流程:
从timer 里取当前的时间点, 然后 animation mgr 去 update 当前的时间,里面的变量的值会更改
然后绘制的时候,去取这些变化了的值,然后绘制上去。
结论:
storyboard 控制 transition
trasition lib 里有很多现成的transition 方案
timer 就不用说了。
IUIAnimationManager::Update method Updates the values of all animation variables.
IUIAnimationStoryboard的 Schedule接口是把 自己放入playing 列表里。
默认情况下:storyboard 会立即执行。
这个URL 一定要好好看看。
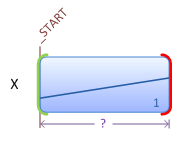
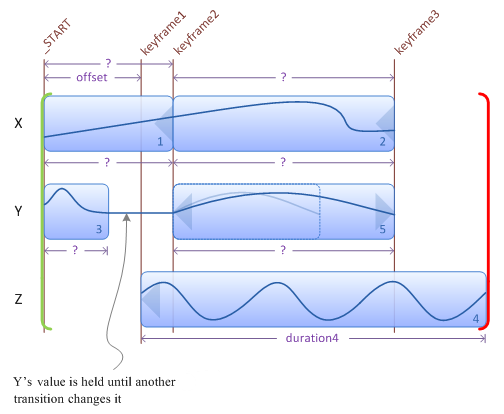
动画就是不断的改变一个变量的值,这个值有可能被赋予了很多个不同的变化方法,storyboard 就是负责这个事情。
就像下面这个图:
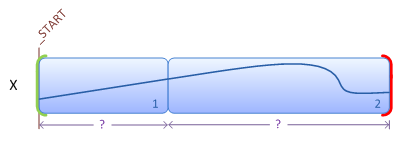
然后再加一个transition,玩过PPT 动画的,应该就能明白了,你可以给一个文本框加很多个tranistion。
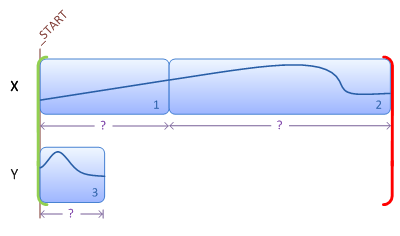
这是针对同一个变量的,你也可以再加一个变量,如下图,当Y开始的时间也可以在X1 (第一个X的transition后)
也可以加入一个keyframe,看图就能明白其意思了:

也可以在一个Transition后再keyframe,as below diagram:
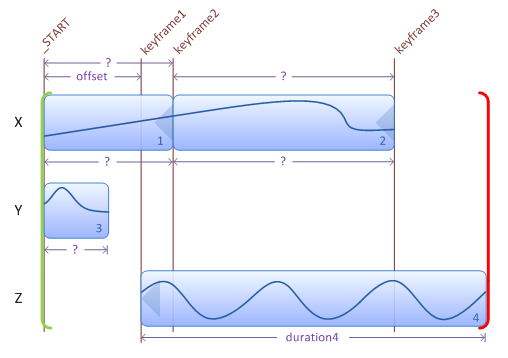
理解了上面的图,下图自然就懂了:
最后还是阅读源代码会有深刻的理解,samples 都在下面的目录,如果你装了SDK7.1
C:\Program Files\Microsoft SDKs\Windows\v7.1\Samples\multimedia\WindowsAnimation\